Mac window snapping is built in on recent versions of macOS. Apple introduced edge and corner tiling with macOS Sequoia 15: drag a window toward a screen edge and macOS previews a position before you let go. Earlier versions still have Split View for using two apps together, but it is a different, full-screen arrangement. Apple’s Sequoia announcement describes the edge and corner tiling feature.
Drag a window to an edge or corner
For the mouse-only method on macOS 15 or later:
- Place the pointer on the window’s title bar and begin dragging.
- Move it toward the left or right edge, or one of the screen corners.
- Pause until macOS highlights the proposed tile, then release the mouse button.
The highlighted area previews where the window will go. To make a side-by-side pair, drag one app to the left edge and another to the right edge, releasing each when its highlight appears. You can use the same method with corner targets when you want several windows visible at once. The exact layouts depend on the macOS version and which positions it offers on that display.
For example, keep a browser with reference material on one side and a document or editor on the other. If the two apps need more room, use one window at a time; if you need to glance at several smaller windows, try the corner positions. No measurements or special app are needed for this basic arrangement.
Apple’s Tile windows on Mac guide covers edge and corner dragging, as well as the other built-in choices below.
Use the green window button for more layouts
If you prefer to choose a layout from a menu, move the pointer over the green button in the upper-left corner of the active window. Apple’s current guide groups options for the active window under Move & Resize, and options that arrange multiple windows under Fill & Arrange. Pressing Option while the menu is open can reveal additional layouts.
The Window menu offers another route. Choose Window > Move & Resize; use a layout under Halves or Quarters to move the active window, or choose an option under Arrange to place multiple windows. Apple notes that menu labels and available layouts can vary by macOS release. These menu choices use the pointer, but opening the menu is a deliberate menu-driven step rather than a screen-edge drag.
Keyboard-assisted: hold Option while dragging
This method still uses the pointer, but it is not mouse-only because it requires a keyboard key. Hold Option while you drag a window toward a screen edge or corner, then release the window in the highlighted position. Apple says this modifier behavior can be switched on or off in window tiling settings.
Check the window tiling settings
If edge dragging does not show a preview, open System Settings > Desktop & Dock and look in the Windows section. Apple lists separate controls for dragging windows to the left or right edge to tile, dragging them to the menu bar to fill the screen, holding Option while dragging, and showing margins between tiles. The setting names and placement may differ a little between macOS versions. See Apple’s window tiling settings guide for the current labels.
Be careful at the top edge. On versions with the relevant gesture enabled, dragging a window all the way past the top of the screen can open Mission Control. Apple documents a separate Desktop & Dock setting named “Drag windows to top of screen to enter Mission Control.” See Apple’s Desktop & Dock settings guide. Dragging to the menu bar to fill a window and dragging through the top edge into Mission Control are different outcomes; stop when the intended highlight appears. Their exact behavior and setting labels are version-sensitive.
macOS 14: use Split View if full screen works for you
macOS Sonoma 14 predates the Sequoia edge-and-corner tiling feature. Its built-in two-app option is Split View: move the pointer to the green window button, choose Tile Window to Left of Screen or Tile Window to Right of Screen, then select the second app for the other side. Apple’s macOS Sonoma 14 Split View guide says the pair opens in a new desktop space.
That distinction matters: ordinary tiling keeps the windows on your desktop with other windows still available, while Split View is a full-screen workspace for two apps. If you need the classic desktop with window edges and corners, use macOS 15 or later’s tiling controls instead.
If a window will not tile
- No edge preview: check the tiling switches in Desktop & Dock, and confirm the Mac is running macOS 15 or later for edge and corner dragging.
- Mission Control appears: the pointer may have crossed the top edge. Use a side or corner target, or review the separate top-edge Mission Control setting.
- The menu shows fewer layouts: hover the green button rather than clicking it, and try Option for additional choices. Labels and available arrangements vary by release.
- An app window refuses to resize: some apps or individual windows constrain their size. Try another window or use Split View if the app supports it.
Optional: a shortcut-plus-pointer workflow with Fling
Fling is an optional command-wheel app. After assigning its Left Half, Right Half, or Fill action to a slot, hold its default Control-Option trigger (or your configured shortcut), flick the pointer toward that slot, and release. This combines a keyboard trigger with pointer movement; it is not a mouse-only replacement for Apple’s built-in drag method, and it does not offer custom screen zones or saved layouts.
Fling needs Input Monitoring to detect the trigger and Accessibility permission to move windows. Its window actions use Accessibility and available app menu routes, so an app that does not expose a usable window frame or menu, or that prevents resizing, may not respond. Fling targets Apple Silicon Macs running macOS 14 or later; it does not target Intel Macs. The developer reports hands-on testing on an M1 MacBook Air running macOS 26 only. This guide does not claim that Fling or Apple’s steps were tested across releases.
If a Fling window action does nothing, check both permissions and try it on a regular, resizable window. Full-screen windows use a separate macOS space and may follow different app behavior; leave full screen and retry if a left- or right-half action does not apply.
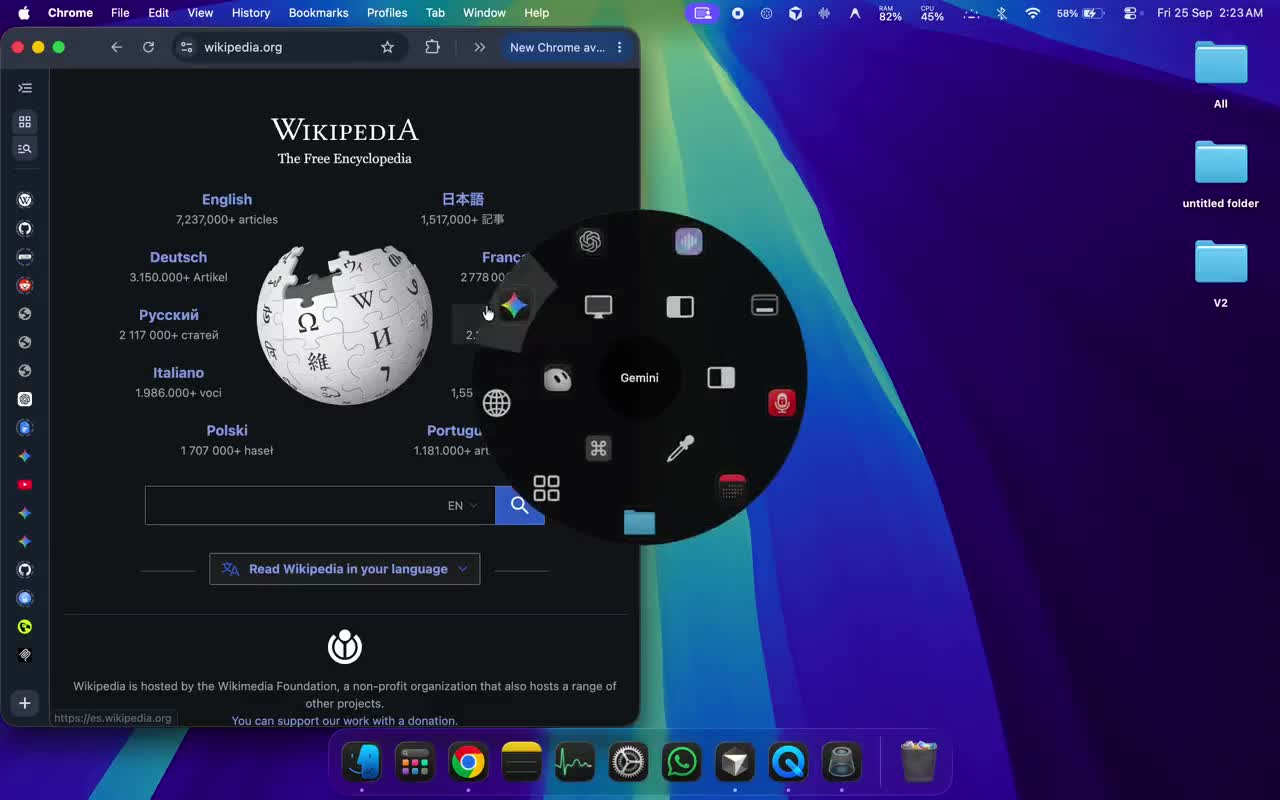
See how Fling’s command wheel works
Explore the configurable actions and setup details if a keyboard-triggered pointer workflow fits your routine.
View Fling featuresFrequently asked questions
Can I snap Mac windows without installing an app?
Yes. On macOS 15 or later, use the built-in edge and corner tiling, green-button layouts, or Window menu. macOS 14 includes full-screen Split View for a two-app workspace.
Can I snap a window to a corner with the mouse?
On macOS Sequoia 15 or later, drag the window toward a corner and release it when the corner tile is highlighted. Layout choices vary by release.
Why does dragging to the top open Mission Control?
On supported versions, dragging a window all the way through the top edge can trigger Mission Control. Apple lists a separate top-edge Mission Control setting in Desktop & Dock; menu-bar fill and the Mission Control gesture are separate controls.
Related Mac guides
This guide is written by Fling’s developer. Apple procedures are based on the linked Apple documentation; menu names and layouts can change across macOS versions. The Fling note describes released product behavior, not an independent compatibility review.